Monday, September 26, 2011

Our Garden 2011

This year was our first real attempt at growing a garden.  We've done a few patio potted plants before, but with the exception of our squash, we haven't been real successful.  

I was especially excited about growing a garden.  

I'm fascinated by the good old days when families grew their own fruits and veggies, hunted for meat, fished, gathered honey & berries, taught their kids from home, rode horses, raised cattle and sheep and chickens, made their own clothes...I'll stop with all that.  My goal in life is to become as self sufficient as possible.  I just don't like relying on others for my needs (or wants for that matter).

Plus a garden makes a yard look more lush and green.  I'm very visual.

First we built some raised garden beds.  We didn't have much in the ways of budget for our yard this year, so I was pleased to find Ana White's plan for making cheap cedar raised beds.  We already had the cedar grape stakes we used for the trellis, but I think the entire box cost less then $12.  Not too shabby!


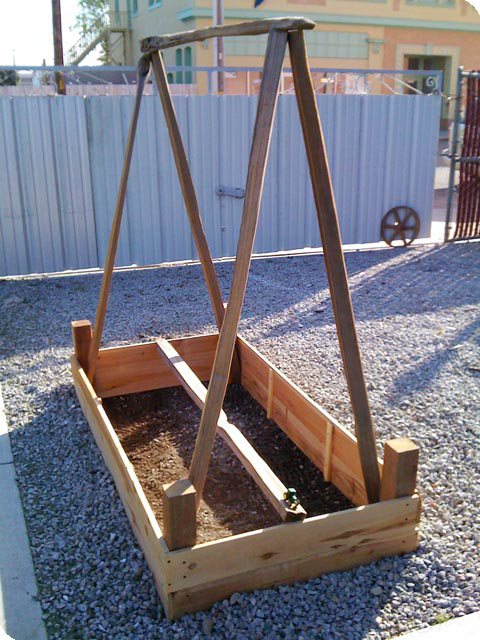
We lined the bottom of the bed with weed mat.  My dad owns an ag plastics company, so we have weed mat, mulch, and greenhouse film coming out of our yin-yang.  For those of you not so lucky, I know Costco carries a decent sized roll for around $30.


 We bought our plants (we got most of them at our local hardware/garden store, but resorted to Home Depot on a few of them).  Filled our boxes full of dirt (unfortunately we had to buy it this year...hopefully our compost will do us justice next year), and planted our plants.


I strung up some wire for the tomatoes to follow.  Unfortunately a couple days later someone (who refused to reveal himself, but of course I'm wiser then he knows) fell and broke my wires, so I had to buy more...this time I got heavier stuff...the stuff they use for pouring concrete.  It's like $3 for a huge roll of it.


In the larger box we planted tomatoes (Early Girl, Cherry, Pear, Mr. Stripey, some Heirlooms, and a few more I can't remember), 1 lingering sweet pepper that didn't fit with the other peppers, and 1 zucchini plant.

My husband wanted an entire box full of peppers (he LOVES peppers...he's spicey!), so I built him a smaller box just for peppers.  We have some sweet peppers, a bunch of jalapenos, a cayenne, a Hungarian kind, and a Bulgarian kind (I think both are supposed to be really hot).


Across the yard I built an even smaller bed for our melons.  Little did we think about it until after we planted 4 plants (a honeydew, yellow watermelon, watermelon, and cantaloupe), that planting just 1 or 2 melons would have probably been sufficient for this box.  Oh well, we'll see what happens!


I'm most excited about our Avocado tree!  I know it won't fruit for a couple years, but none the less, I'm excited!  We got a Zutano, which has a softer shell, but is supposed to taste richer.  It is also supposed to survive frost better.  We don't get much frost, so hopefully we won't have to worry about that anyway.


 In our avocado bed, we planted some basil, pesto basil, rosemary, cilantro, and parsley.  As the tree gets bigger, I think I might just stick with a bushy something on each side...the rosemary and maybe something else on the other side.


 My other favorite is the dwarf mandorin tree. Mmm!


So there's our garden thus far.  We'll see how it goes!

(Note:  Although I'm a slacker and am posting this at the end of September, we actually planted our garden back in April.)

Teriyaki Mayo Salmon

We spent the weekend with my in-laws last weekend, and while there we celebrated my aunt-in-law's 60th birthday.  One of the main courses was salmon, which my mother-in-law asked my husband to help prepare.  He ended up making the whole thing, which turned out delicious!  He's so good about making up his own recipes.  Something I wish I was better at.  The key is he's not afraid to try anything.  His philosophy is if it doesn't taste just right, add something else to make it taste better!  Doesn't always work, but it certainly did this time.


He made two different variations - the Teriyaki Mayo Salmon, and the Teriyaki Wasabi Mayo Salmon.  The wasabi one he just added wasabi horseradish and saffron to regular mayo.  I can't stand horseradish or wasabi, so I didn't try this one, but those who did, said it was delicious.

  • Salmon fillet(s)
  • Mayonnaise
  • Dried parsley
  • Salt
  • Pepper
For Teriyaki Sauce:
  • 1/4 cup Soy Sauce
  • 1 cup Water
  • 1/2 tsp Ginger
  • 1/2 tsp Garlic Powder
  • 5 tsp Brown Sugar
  • 1 Tbsp Honey
  • 1 Tbsp Cornstarch
  • 1/2 cup cold water
 For Wasabi Salmon:
  • 1 tsp Wasabi Horseradish
  • pinch of Saffron (optional)
Preheat oven to 375°.

Sprinkle both sides of fillets with salt and pepper.  Place in a baking dish lined with foil (makes clean up a LOT easier!).

In a small bowl, mix the mayo with some dried parsley; set aside.  If you choose to make the Wasabi Mayo Salmon, add Wasabi Horseradish  and a pinch of saffron to the mayo mix.

In a cup or small bowl, combine the 1/2 cup cold water with cornstarch; stir to disolve and set aside.

In a sauce pan, combine the soy sauce, 1 cup water, ginger, garlic powder, brown sugar, and honey.  Bring to a boil, stirring constantly.  Boil for 3-5 minutes, stirring.  Add cornstarch/water mixture.   Boil for another 3-5 minutes, or until it is to your desired thickness.  Remove from heat.  Let cool. 

Pour desired amount of Teriyaki Sauce over salmon fillets.  Lightly spread desired amount of mayo/parsley mixture over the top of the salmon (we used too much on ours...was delicious, just a little greasier then it needed to be).

Bake for 12-15 or until done (may be sooner or later...make sure you don't over cook it!).

Enjoy!

Taco Soup

A few weeks ago my husband's church group was asked to feed the homeless.  Since he is the current el presidente, he was in charge of organizing it.  Of course he didn't find out about it until 10pm 2 nights before he was supposed to do it.  And it was just our luck that 99% of the group (and their wives) were all out of town running the Napa Ragnar.  Sooo it was just our luck that the responsibility, therefore the entire work load fell entirely on my husband's shoulders (aka MY shoulders!).  We scurried to figure out what was something good, but easy to make, that would have something in it that most people might have in their cupboards already.  Luckily people dropped off food as they headed out of town for the race!  So my hubs and I...okay really just me...spent the afternoon cooking Taco Soup for what we assumed would be 120 people max.  Two missionaries came and helped us serve the food and of course my mom was out of town, so I had to drag all 3 kids with us (definitely didn't help things much).  As things hardly ever go in our favor, this turned out to bed the BIGGEST turn out they'd seen there and our soup for 120 people had to feed about 175.  It was like Jesus feeding the 5000 with only 2 loaves of bread and 5 fish (or whatever it was).  We miraculously had enough food for everyone (even with some coming back for seconds) AND we even had a good amount of leftovers.  Either I'm really bad at calculating food for large numbers (which is most certainly the case), or there were major miracles happening that night! :-)

All of the hard work we put into it was worth it to watch our oldest son so eager to help out.  He couldn't really serve the soup, so he whipped on the gloves and handed trays to those who were serving!  


 Helping those who are less fortunate then us, really puts our lives into perspective.  The thing that effected all of us the most, was seeing the little children go through the line.  Some of them had no clue of their unfortunate circumstances, but some were so sad.  You could read it in their faces that they have gone through hell and back.  I just wanted to swoop them up and take them home with me.  Definitely makes me grateful for the things that I CAN provide for my children and stops me griping about what I CAN'T!

Here's the recipe:
  • 3 cans beans (I usually use kidney, garbanzo, and black beans, but you can use whatever you choose)
  • 2 cans Italian stewed tomatoes
  • 1 can corn
  • 2-3 large spoonfuls of taco seasoning
  • Grated cheese, for garnish (optional)
  • Sour cream, for garnish (optional)
  • Tortilla chips, for garnish (optional)
Dump everything but the garnishes into a big pot on the stove.  (You may rinse the beans first if you want to, then add 2 cans of clean water to the pot for more liquid.)  Cook until heated through.  Crunch up some chips in the bottom of a bowl.  Add taco soup.  Top with cheese and sour cream.

Wednesday, September 21, 2011

Nature Scavenger Hunt

This past weekend we went for a visit to my in-laws property.  My boys LOVE it there!  I must extra emphasize the "LOVE!"  They'd move there in a heart beat if we let them.  Part of the allure is having cousins running around with them.  But occasionally there aren't any cousins to play with and the boys need the extra push to find something to do. 

I made some scavenger hunt cards for school a while back, but hadn't used them yet.  I wasn't sure how long we were staying, so I brought a couple of our homeschooling things with us...these scavenger hunt cards were included.
 (click on picture to make it better for download)

The boys loved them.  Not quite as much as they LOVE their grandparents house (that's hard to beat!), but nonetheless they were a hit.


It was fun watching them work alone...


and work together.

(yes, I know, my kids are dressed quite scruffy, but that's how we roll out here on the property...they get so dirty, its not worth bringing nice clothes!)


When they were done, they brought me their cards.


Good job, guys!

Apple Picking


Since we started homeschooling, we haven't been to our playgroup much.  So when we heard they were taking a field trip to our favorite barn to pick apples, we were in!  My 2nd grader is learning about plants right now, so it was a perfect field trip.

 We all boarded the tractor trailer and headed down the dirt road toward the apple orchard.


The boys grabbed their bags and were off to find the biggest, reddest apples they could find!


They picked...


and picked...


and ate...


and picked and ate!


We filled 2 paper bags full, but stopped there.  We could only carry so much back!

We road the tractor back, then hung out around the barn for a bit.  

The boys climbed on the hay bail wagon.


Whats a trip to the barn without feeding the animals?
 
The boys shared their apples with the donkeys!


Checking out Thanksgiving dinner...just kiddin'!


Then my oldest sat some of the little kids down...


and taught them all how to properly climb a tree.  

It totally caught on!


Good job kids!


We had a great time!

Can't wait to go back for pumpkins in a few weeks!

Stamppot


My dad was an immigrant, born in Holland, who moved to America with his family when he was a young boy.  Not speaking a lick of English, he was thrown into "the system" where he was left to fend for himself and learn English on his own.  Not like schools now a-days, where they give you an interpreter, translate all of your papers going home, and even have special schools set up just for those who don't speak English.  Crazy how times have changed (for better or worse)...but that's another topic.

I feel privileged to have been raised by an immigrant.  It has given me a close connection with my Dutch heritage.  If you were to meet my dad, you probably wouldn't have a clue he was Dutch, other than his super height...you know the Dutch are the tallest people in the world?  My family is living proof of it.  I'm the "shrimp" of the family at about 5'9".  I'm tiny! My brother is 6'7" & 3 of my 4 sisters are over 6' tall.  We're big people.  Anyway, we're quite Dutch. You meet my grandparents and you'd DEFINITELY know it!  Still after over 50 years, my Oma and Opa have thick, thick accents.  They keep their birth country near and dear to their hearts.  We celebrate Sinterklaas Day (kinda like a Dutch Christmas at the beginning of December) with our own wooden shoes and chocolate letters and everything.  Zwarte Piet even comes and throws candy and pepernoten in our door!  I've learned to make and eat some traditional Dutch meals.  I'm sure my versions of them are probably very Americanized (or at least Julie-ized), but none the less, they connect me to my dad and my grandparents and therefore my roots in Holland.  


One of my favorites in Dutch cuisine is a traditional dish called Stamppot.  From what I understand the name comes from exactly how it sounds, "Stamp Pot." You cook up some root veggies (I usually just use potatoes, carrots, & onions), then you "stamp" or mash them in the pot.  We always serve it with kielbasa...in Holland it is usually served with rookworst (sounds a lot worse then it really is...smoked sausage), but they also have it with stewed meat.  As a kid my Oma (grandma) would sometimes serve it with a roast.  She also occasionally made it with red cabbage, which used to be my favorite, which is really weird because I hated red cabbage otherwise.  I don't think there's really a "right way" to make stamppot...its kind of like stew here in America...as long as you have the main ingredients, meat & potatoes, its still stew.  Same with stamppot - got the potatoes and sausage & you're good.  You can sauce it up with gravy (the Dutch LOVE their Jus - pronounced "shoo" aka gravy!), but my family makes it with lots and LOTS of butter!  Mmm.

Note:  This recipe can be made SO many different ways, so this is just how I make it!
  • Potatoes, peeled, cut into quarters
  • Carrots (I used about 1 1/2 cups baby carrots so I don't have to cut them)
  • Onion, diced (I use 1 large, but add according to your liking)
  • 1 Kielbasa sausage, sliced into medallions (for my kids sake, I cut the medallions in half so they're bite-sized)
  • Butter
  • Salt, to taste
Place cut potatoes and carrots in large pot.  Cover with water and boil until both carrots and potatoes can be punctured easily with a fork and are ready to be mashed (just as you would mashed potatoes).

While potatoes and carrots are cooking, place about 1/3 to 1/2 cube butter in heated pan.  When butter has melted, add onions and saute until onions are nice and soft and start to caramelize. 

In another pan (or you can remove the onions and use that pan), add a tad bit of olive oil or butter, melt, and sliced Kielbasa.  Fry on both sides until golden brown.  Put sausage aside, or if you want, dump them in with the onions (make sure you dump all the butter and oily juices in there too!).

When potatoes and carrots are done cooking, drain out water.  Throw in a load of butter (I start with 1/2 a cube, but usually end up putting in the rest of it).  Mash until they're to the consistency you want (I suggest not mashing them quite as smooth as mashed potatoes.  The chunks kinda makes it feel more authentic.).

Throw in the onions (and sausage if you want...I do put them in only because my kids will only eat the sausage if I put it separate).  Mix it all up.  Taste it and if it needs salt and pepper, add some to taste.  If it needs more grease...I mean butter, add more.  Its all to your liking!

You can serve with gravy, but really the sausage grease and butter make it plenty moist and tasty.

Monday, September 12, 2011

Lärabars

I have to admit I have tried Lärabars before, but its been a while and I have no idea if I like them or not.  BUT in my Tasty Kitchen perusing, I came across this recipe.  It's gluten-free, dairy-free, and most importantly peanut-free, so I thought I'd take a whirl at it and see if my kids would dig it.  Oh, they dug it alright!  The dates made me a little nervous.  I've never made anything with dates in it before.  As a child I remember my mom using the dried out dates (you know the pellet things) in stuff and they always looked like rabbit food, so I never wanted to try them.  Turns out dates are awesome in Lärabars!  These really turned out good...my boys not only ate them, they begged for more.  My oldest son was SO excited (he gets that way when we find something tasty AND allergy-free for him!).

  • 2 cups Raw or Toasted Whole, shelled Almonds
  • 1 cup chocolate chips or chopped dark chocolate
  • 4 cups whole, pitted dates
  • 2 Tbsp Natural nut butter (peanut, sunflower, cashew...or we used almond butter), divided (or more, if necessary)

Line a 9-inch x 13-inch straight sided pan with a piece of parchment paper so that the paper hangs over the long edges. Set aside.
Fit a food processor with a metal blade. Add the almonds to the processor and pulse until they are uniformly finely chopped (think fresh bread crumb texture.) Add the chocolate chips and pulse again until the chocolate chips are also finely chopped. Pour the chocolately nuts into a large mixing bowl and set aside.
Add half of the dates to the food processor and process until a paste forms and clumps together in the workbowl. Open the food processor and add in 1 tablespoon of the nut butter and half of the chocolatey ground nuts. Replace the lid and process until evenly combined. Scrape into the prepared pan.
Repeat these steps with the remaining dates, chocolatey nuts and nut butter.
When all of the ingredients have been thus processed, wet your hands and use them to press the mixture as evenly over the bottom of the pan as possible. Fold the excess parchment over the bars to cover them and use something flat and heavy to press down firmly on the mixture until it is smooth.
Refrigerate for at least 2 hours before moving onto the slicing surface.
To slice:
Use the excess parchment paper like a sling to transfer the now-firm bars from the pan to a large cutting board.
Cut into desired size (I did 24 squares) and store in the refrigerator in a tightly covered container. An unrefrigerated bar will be good for 48 hours, covered, at room temperature.

Hawaiian Chicken

This is a childhood favorite of mine.  It was passed on from a lady at church to my mom, who gave it to me.  It really is very easy to make, it just takes a little time for the marinading (although I don't always do it).  

This recipe calls for chicken thighs.  I HATE chicken thighs!  They're nasty to me. When I was probably 10 or so, I remember standing at the sink with my older sister, removing the skin off the chicken thighs (back then it was very rare to buy boneless, skinless anything).  It totally grossed me out...you could totally see the pours on the skin and there were still a few small fuzzy feathers attached.  How sick is that?  Thanks to this lovely experience, I very rarely buy skin-attached chicken.  I NEVER buy chicken thighs.  I've been scared for life!


  • 1/2 cup ketchup
  • 1/2 cup soy sauce
  • 1/2 cup sugar
  • 1/4 tsp pepper, optional
  • 1 Tbsp Worcestershire sauce
  • Few drops of hot sauce, optional
  • Boneless, skinless chicken thighs (or pork or beef) - I use boneless, skinless chicken breasts cute in thick halves or you can use tenderloins (so many possibilities!)
Mix ingredients together (minus the meat). Pour in Ziploc bag with boneless chicken thighs. Let marinade in fridge for a few hours or over night. Pour all in baking dish. Bake at 350° for 1/2 hour to 45 minutes.  Serve by spooning sauce over rice with chicken.

Goldfish...err...Cheesy Crackers

The other day I was frequenting Tasty Kitchen when I came across a recipe for homemade goldfish crackers.  Lately I've been on a quest to find tasty treats my kids will like, but that won't trigger their allergies...an allergy triggered kid in my household is NOT one you want to cross paths with!  One eldest son (and probably my 2nd as well) is allergic to wheat and possibly has a gluten intolerance (we just avoid anything with gluten since it usually has wheat in it) and one of the snacks he says he REALLY misses is goldfish crackers.  I was SO thrilled to come across this recipe so I could try making a gluten free version. He really should avoid dairy too, but I couldn't resist making him just one delicious batch of one of his favorite snacks!  I tried making myself a goldfish cookie cutter out of tin foil.  It worked for the 1st 2 crackers, then it kinda fell apart.  So I gave up and made bite-size circles instead.  So I guess they're not "technically" goldfish crackers, but really who's counting anyway?

  • 8 ounces, weight Sharp Cheddar Cheese, shredded
  • 4 Tbsp butter, cut into cubes
  • 1 cup flour
  • 3/4 tsp salt
  • 2 Tbsp cold water
Pulse everything (except water) together in the food processor until the dough resembles coarse sand.

Pulse in water, 1 Tbsp at a time.

Remove dough from the processor, wrap in plastic, and chill for 20 minutes.

Roll out the dough adn cut into desired shapes.  you can use a toothpick to make the eyes and smile if desired.  Place on a parchment paper lined cookie sheet.

Bake at 350°F for about 15 minutes, or until crispy.

Makes approximately 7 dozen crackers.

Tri-Tip Fajitas

We had a delicious dinner at my parents the other night, which my mom sent us home with a bag full of leftover tri-tip.  If you don't know what tri-tip is...I'm sorry!  I'm not really gonna go into it, but ri-tip is a certain cut of beef that was started in a town not too far from where we live.  Its good.  Anyway, I had this leftover tri-tip.  I've never made fajitas before (well I have, but only from a bag of Trader Joe's frozen fajita mix), so I thought I'd have a try at it.  They turned out YUM-MEE!  I totally made it up, so any of you die-hard fajita fans, please don't judge me!  


  • Leftover tri-tip (or steak or pork or whatever), sliced into strips (about 1/2" wide, 2-3 inches long, doesn't really matter so much the size)
  • Onion, sliced
  • Bell peppers (I like a variety of different colors), julienned
  • 1/4 cup Taco Seasoning
  • 3/4 cup Water
  • Cheese, shredded (cheddar or Jack are good)
  • About 1 tsp sugar
  • Olive oil
  • 1-2 Tbsp butter
  • Tortillas (corn or flour)
  • Sour cream (for garnish)
Heat about 1 Tbsp olive oil and 1-2 Tbsp butter in a medium to large skillet on medium heat.  When butter has melted, throw in your sliced onions.  Toss a little to disperse the oil/butter on all the onions.  Let cook down, stirring occasionally.  Make sure they don't burn!  When the onions are about 1/2 done (when they're starting to get flimsy & somewhat translucent), sprinkle them with about a teaspoon of sugar (unless you're using sweet onions or don't want sweet caramelized onions).  This gives them a little sweetness.  Also add the bell peppers (I used frozen julienned peppers from Trader Joes).  Let cook down until just right (I like them nice and soft...if you like them harder, then stop cooking soonder!).

Meanwhile in another pan, heat a little oil and heat up your sliced leftover meat.  When its heated through, sprinkle with 1/4 cup Taco Seasoning (more or less depending on how much meat you have) and 3/4 cup water.  Stir thoroughly.  Bring to a boil.  Simmer for 10-20 minutes until the water has gone down and the seasoning has soaked into your meat.

When everything is cooked, heat up your tortillas - if you're lucky enough to have a gas grill, warm 'em on a burner.  Otherwise through 'em in the oven real quick or in the microwave for 20-30 seconds until they're just warm enough and are more flimsy.

Top tortillas with onion/pepper mixture, meat, shredded cheese, and sour cream (in whatever order you wish!).

Enjoy!

Saturday, September 10, 2011

This year


This year will be our 2nd year of homeschooling.  I can't say our first was all bells & whistles.  In fact I'd say it was kind of a disaster.

We got off to a rough start.

I started too quickly without doing my research.  I tried to create my own curriculum as we went, which was NOT a good idea seeing as I had a 3-year old AND a 4-month old baby, not to mention we were living at my parents house while our home was being renovated.  Not quite the ideal setting.  There were some pluses, like the one-on-one attention my son needed for reading and we focused on things that interested him, like Earth Science (the kid is OBSESSED with rocks & crystals!) & Chemistry.  He spent 2 years in public school, which was mostly a wonderful experience (we had a really good school), but he had some struggles academically, which put him behind.  In turn, he began hating school (the academic side anyway...he LOVED the social aspect), which was really sad to watch, seeing as he has always been one who loves learning.  The most productive part of this last year has been watching my son regain his love for learning through things that HE was interested in.  Other than that and the 1-on-1 he got for reading, the year pretty much was a flop.

So this year I decided things HAD to change!  Around February I started a mission to make our homeschool classroom a better environment for learning.  Step number 1 was moving out of my parents house and into our new home, where we established a room dedicated to learning.  Then I researched like I'd never researched before.  I checked out my library, ordered some books, borrowed some books, scored the internet over and over.  I finally got homeschooling!  Of course there is SO much room for growth, but I'm getting it.  And the best part is I've made things easier for me and my son!  

First off we enrolled in a hybrid charter, which is modeled under the Classical method/style.  Since its a public school, its free and they provide us with free curriculum (we get to choose from their list of okayed material, which most of it I would have gotten regardless).  They meet 2 days a week, in which they teach History, Science, Geography, Art, & Music, with a little of everything else in between (math, reading, writing, etc).  I'm still the primary teacher, but this takes a huge load of work off of my shoulders, plus he gets the socialness he wants.  

Second, for our home studies, we decided to implement the workbox system.  In my research I came across Sue Patrick's workbox system.  Everything I read about it was positive and it just sounded like something that would work good for our kids.  We're still in the process of refining it, but after only a couple days I could see such a major change already!

Third, I admitted I don't have the time or energy to create my own curriculum, so I've turned to the ready made stuff.  I'm still not real down with curriculum packages - you know the ones that come from the same company for ALL of the subjects.  I kinda like the idea that someone specializes in Math or Language Arts or Science, etc.  So far I'm very happy with my curriculum choices, but then again we're not even through the first month!

Fourth,  I take my daily dose of chill pill every day.  I'm slowly but surely changing my mind set from public school thought to classical thought.  Deadlines shouldn't dictate our education, learning should dictate our education.  If my son is getting a subject and is ready to move on, why bore him by repeating it over and over and over again?  He gets it, he's practiced it, now move on.  On the flip side, if he's made his way through a lesson and is absolutely lost, we don't have to move on until he DOES get it.  Isn't that beautiful?  

PW's Chicken Tortilla Soup

I've been wanting to try a good tortilla soup recipe for a while now, but never have gotten around to it.  The other day I came across this recipe on the Pioneer Women.  Remember what I said about the PW NEVER letting me down?  Well she lives up to the reputation yet again!  This soup was fantastic!  It took some time to make (mainly sitting time while it simmered), but it was super easy.  I have a confession to make, though, I totally skipped the "4 cups hot water" step...um, ya I just noticed that JUST NOW!  So I guess I'm gonna have to try this again the right way and see if I love it as much! :-) I think my 1-year-old loved it the most.  He saw the leftovers in the fridge this morning and begged and begged until I made him a bowl.  This is definitely going into our list of our family favorite recipes!


  • 2 whole Boneless, Skinless Chicken Breasts (I actually used 5 boneless, skinless chicken tenderloins, since that is all I had on hand)
  • 1 Tablespoon Olive Oil
  • 1-1/2 teaspoon Cumin
  • 1 teaspoon Chili Powder
  • 1/2 teaspoon Garlic Powder (I was out of this, so I eliminated the salt and used 1 tsp of garlic salt)
  • 1/2 teaspoon Salt
  • 1 Tablespoon Olive Oil
  • 1 cup Diced Onion
  • 1/4 cup Diced Green Bell Pepper
  • 1/4 cup Red Bell Pepper
  • 3 cloves Garlic, Minced
  • 1 can (10 Oz. Can) Rotel Tomatoes And Green Chilies
  • 32 ounces, fluid Low Sodium Chicken Stock
  • 3 Tablespoons Tomato Paste
  • 4 cups Hot Water
  • 2 cans (15 Oz. Can) Black Beans, Drained
  • 3 Tablespoons Cornmeal Or Masa
  • 5 whole Corn Tortillas, Cut Into Uniform Strips Around 2 To 3 Inches
FOR THE GARNISHES:
  • Sour Cream
  • Diced Avocado
  • Diced Red Onion
  • Salsa Or Pico De Gallo
  • Grated Monterey Jack Cheese
  • Cilantro
Preheat oven to 375 degrees. Mix cumin, chili pepper, garlic powder, and salt. Drizzle 1 tablespoon olive oil on chicken breasts, then sprinkle a small amount of spice mix on both sides. Set aside the rest of the spice mix.

Place chicken breasts on a baking sheet. Bake for 20 to 25 minutes, or until chicken is done. Use two forks to shred chicken. Set aside.

Heat 1 tablespoon olive oil in a pot over medium high heat. Add onions, red pepper, green pepper, and minced garlic. Stir and begin cooking, then add the rest of the spice mix. Stir to combine, then add shredded chicken and stir.

Pour in Rotel, chicken stock, tomato paste, water, and black beans. Bring to a boil, then reduce heat to a simmer. Simmer for 45 minutes, uncovered.

Mix cornmeal with a small amount of water. Pour into the soup, then simmer for an additional 30 minutes. Check seasonings, adding more if needed---add more chili powder if it needs more spice, and be sure not to undersalt. Turn off heat and allow to sit for 15 to 20 minutes before serving. Five minutes before serving, gently stir in tortilla strips.

Ladle into bowls, then top with sour cream, diced red onion, diced avocado, pico de gallo, and grated cheese, if you have it! (The garnishes really make the soup delicious.)

Tuesday, September 6, 2011

Our Workbox System

This year we've decided to implement the workbox system.  In my research I came across Sue Patrick's workbox system.  Everything I read about it was positive and it just sounded like something that would work good for our kids.  We're still in the process of refining it, but after only 3 days I have seen such a major change already.

What do I like about it?
  1. My children can be more independent.  They have all of their work & the tools to do their work right there in front of them, so they can independently do their work.
  2. Gives me more freedom.   I don't have to stand there next to them telling them what they need to do and what comes next.  My son is still struggling with reading, which means he still needs help reading directions for many of his assignments, but this way we both know ahead of time what he can do on his own and what he needs my help with.  
  3. Makes planning the week quicker and easier.  I plan once a week what is going inside the boxes.  It takes about an hour (give or take).  I know what things he needs to accomplish each day and the things that I want to add in between.  
  4. Takes the stress of the unknown out of the day.  There's no more asking "When are we gonna be done?" or "How much more do I have left?" or "when do we get to do [fill in the blank]?"  He knows what he's done and what he has left.  My son gets overwhelmed very fast.  If I ask him to clean his room and there are toys everywhere, he doesn't see that they're all legos and all you have to do is put them in the lego bin.  He sees there are way too many toys for him to pick up, so why even try, because he'll never be able to do it all himself.  But if someone comes and does it with him, even if it means I only pick up 1 lego, he'll do all the rest just knowing someone is there to take part of the load off.  Thats kind of how school work is with him.  If I tell him he has Group Time, History, Science, Math, Reading, Phonics, Grammar, Spelling, Vocab, Life Skills, Art, Music...to do today, or he sees a tall stack of books, he wigs out.  I might as well have thrown him into a pit of starving crocodiles.  But having all of his work separated, yet right there in front of him, he doesn't feel so overwhelmed.  He can see that it isn't as much work as it sounds.  
  5. The day goes by so much quicker!  My son doesn't complain as much and he's actually already figured out that the sooner he gets through his work, the sooner he'll get to have free time.  
Here's our workbox system so far.  It's not quite as I want it to be yet, but its all I could pull together before school started (I'm an over achiever, I know).

The boys clock in/clock out cards.  Each day they clock in and clock out so they have the visual of starting and finishing school.  My 4-year-old especially likes this!

(I totally snaked the idea for the look from Spell Outloud.)


Their workbox grids/schedules.


As the boys finish their work, they take the tag from their workbox and place it on their grid.


If you don't want to make your own activity cards, you can download them from Homeschool Creations.  One of these days I'll upload mine for download as well.

Their grid shows them the order in which they get things done.  We start off with Group Time, then we move on to workboxes.  Once they've gotten their first 2 workboxes complete, they get to have a snack and take a 10 minute break.  So they can see on the grid what they need to do in order to take a break and have a snack.


Here are are my oldest son's workboxes thus far.  I love these bins (found in discount section at Target for $2.50/each), but I could only find a total of 7, so he gets 4 & my younger son gets 3.  We just double up and some times triple up on assignments per box.  Eventually I'd like to get more and build a rolling library cart to put them on.


When he's all done with his assignments, he places them into the "Finished Work" bin above his workboxes.


Here's what his whole workbox system looks like (you can see my preschoolers workboxes in the background).  We're using an old antique school desk to place it all on.


We've definitely changed Sue's system a bit to fit our needs and style, but its been great so far!

If you want to learn more about Sue Patrick's Workbox System or would like to order her book, visit her site here.  If you're looking for cool ideas others have done with their workboxes, search "sue patrick workboxes" in google images.  

Monday, September 5, 2011

PW's French Onion Soup

You'll soon come to find that I am an avid Pioneer Woman follower.  I love her.  I love the life she portrays (can't say she lives, because everyone knows that as real as you may be on a blog, really, come on, we know life isn't always happy times and perfection...well maybe for the Pioneer Woman, I don't know heehee :-) ) My dream is to live out in the open with a beautiful house and property that I really don't have to leave unless I want to, to raise cattle & have wild horses running through my yard.  And I wouldn't mind seeing my husband in Wranglers & chaps, riding a horse, roundin' up cattle, either.  I LOVE it!  I'm quite envious in a way.  My boys would love it too.  They all think they're cowboys anyway.  My oldest is VERY upset that he grew out of his cowboy boots & clothes & I haven't gotten him new ones yet.  Shame on me! 

Anyway, the Pioneer Woman is wonderful.  When it comes to food, I know I can ALWAYS count on her.  She NEVER lets me down.  There is NOTHING she has ever posted that I have tried that has been anything other than pure bliss.  This recipe being one of them.  Its SO good!  I do have to admit that I forgot to get Gruyere cheese, so I used the Mozzarella I had on hand...tasted great, but definitely needed a little bit saltier of a cheese (hence the reason why Gruyere is perfect).  For some reason I've always been scared of making onion soup.  Don't really know why, I guess I just always figured it would take too long to make, but it was WAY easy.  And it gets better as the days go by.  We ate it a couple days in a row and each day it just got better and better!  Mmm, makes my mouth water just thinking about it!


    • 1 stick Butter
    • 4 whole Large (or 6 Medium) Yellow Onions, Halved Root To Tip, And Sliced Thin
    • 1 cup (generous) Dry White Wine (I used chicken broth)
    • 4 cups Low Sodium Chicken Broth
    • 4 cups Beef Broth
    • 2 cloves Minced Garlic
    • Worcestershire Sauce
    • Several Thick Slices Of French Bread Or Baguette
    • 5 ounces (to 7 Ounces) Gruyere Cheese, Grated
    Preheat oven to 400 degrees.
    Melt butter in a heavy soup pot or Dutch oven over medium-low heat. Add onions and cook, covered, for 20 minutes. Place soup pot into the oven with the lid slightly ajar to ensure the onions will brown. Allow onions to cook in the oven for 1 hour, stirring at least once during the cooking process so onions won’t stick and burn.
    Remove pot from oven and place back on stovetop over medium heat. Stir, scraping off all the brown, flavorful bits. Turn off heat and pour in wine. Turn heat back to medium. Cook wine for five minutes, allowing it to reduce. Add broths, Worcestershire Sauce and minced garlic and reduce heat to low. Simmer for 30 to 45 minutes.
    Butter one side of the bread slices and broil over low heat, allowing bread to brown and become crispy.
    When soup is ready, ladle into bowl or ramekin. Place crispy bread on top, and then sprinkle generously with grated cheese. Broil until cheese is melted and bubbly.
    Serve immediately.

                    Borders Deals

                    One of our favorite family non-outdoors activities is going to Borders.  They have the best Bargain section!  My sister informed me that no one actually ever gets anything good from the Bargains section because all they have are cookbooks and history and children's books.  Um, aren't those the best ones?  We decided my family is probably the only ones who benefit from these bargains, which I have absolutely no problem with.  More for us, right?  

                    Borders is going out of business...I'm SO sad!  Somewhere in the midst of my pity party I found my way down to our local store and found some incredible deals.  I spent an hour and 1/2 with my poor baby who had just visited the doctor for his 15 mos shots, digging through what was left of the store.  When my baby was finally at his wits end, and I was at my wits end with him, I made my way to the long check out line, waited for 15 minutes, only to find out when I got to the front that they don't take checks.  Uh, SO frustrating!  Normally I wouldn't care.  I'm SO not a check writer (don't worry, I'm not one of THOSE people that holds up the line), but our debit card was hacked into, so we had to cancel it and wait for another to come in the mail and of course that had to happen the week I went into to Borders.  So I had to let all of my good deals go and walk out of the store empty handed.  

                    The next day I visited the bank and got cash before I headed back to the store.  To my shock, amazement, and wonder, ALL of my books were still there (guess my sisters right, maybe people really don't want my books...yay!), plus a few new ones.  So here's what I got (there's 2 books missing from the picture-couldn't pry them away from my kids to take the picture):


                    So sad Borders is closing, but so happy for my fabulous finds!  I just got an email saying they only have 10 more days left, so I'll be heading down there at least once more...make sure you do too!

                    Sunday, September 4, 2011

                    Butternut Squash Soup

                    One night for a women's church activity they served the most delicious butternut squash soup.  It was to die for!  I hunted down the recipe and as it turns out, they girl who had made it, originally made 1 recipe, but thought it was too gingery, so she made another recipe.  She didn't want to waste the first batch, so she mixed the two pots together and created a masterpiece!  Sounds cheez-whiz, but really, it was SO good!  I haven't made the 2 together yet, I just made the 2nd recipe she used and it was really good too (but not quite like the one with both recipes!).  I'm including both recipes, so just know the 1st is the one I used, the 2nd was the one my friend thought was too gingery, and if you mix the both together, it creates perfection.


                    Recipe #1 (the one I used)Butternut Squash Soup

                    Serves 6-8
                    • 1/2 T olive oil
                    • 1 T butter
                    • 1/2 C sliced carrots (abt 1 med carrot or 12 baby ones)
                    • 2 stalks celery, diced
                    • 1 C diced onion
                    • 4 large garlic cloves, minced
                    • 1 medium butternut squash, (abt 4 cups peeled and diced)
                    • 1 medium potato, diced (about 2 C diced)
                    • 32 oz chicken broth (that’s one box/carton)
                    • 1 T brown sugar
                    • 1 1/2 t kosher salt
                    • 3/4 t dried sage
                    • 1 pinch cayenne pepper or a douse of hot sauce

                    In a large stock pot, heat olive oil and butter. When butter is melted add onions, carrots, celery, and garlic.

                    Saute for 2-3 minutes or until onion is tender. Add the squash.

                    Then add potato, sage, salt, red pepper, and chicken broth. Bring to a boil and then turn down to a simmer. Simmer with the lid on for 30-40 minutes or until everything is tender. Check a piece of squash and also a piece of celery and potato to make sure they area fork tender. Stir in 1 T brown sugar.

                    Use an immersion blender, or transfer soup to a regular blender and puree until smooth.

                    A small drizzle of heavy cream or sour cream is good on top.

                    Recipe #2 (the one my friend thought was too gingery): Curried Butternut Squash Soup with Coconut & Lime
                    Serves 4
                    • 1 1/2 Tbs. olive oil  
                    • 3/4 cup sliced shallots  
                    • 1 Tbs. minced or grated fresh ginger  (this is WAY too much…just a tiny bit goes a long ways
                    • 1 garlic clove, minced  
                    • 9 cups peeled and cubed butternut squash (about 3 lb.)   
                    • 3 cups chicken or vegetable broth  
                    • 1/2 tsp. salt, plus more, to taste  
                    • 1 tsp. Thai red curry paste  
                    • 3/4 cup light coconut milk  
                    • 2 tsp. fresh lime juice  

                    In a large pot over medium heat, warm the olive oil. Add the shallots and cook until softened, 2 to 3 minutes. Add the ginger and garlic and cook until fragrant but not browned, about 1 minute more. Add the squash, broth and the 1/2 tsp. salt, increase the heat to high and bring to a boil. Reduce the heat to maintain a simmer, cover and cook until the squash is tender when pierced with a fork, about 20 minutes. Let cool slightly. 

                    Put the curry paste in a small bowl and stir in the coconut milk until well blended.

                    In a blender or food processor, puree the soup, in batches if necessary, until smooth. Return the soup to the pot and stir in the coconut milk mixture. Heat the soup until just hot, then stir in the lime juice and adjust the seasoning with salt. Ladle the soup into warm bowls and serve immediately.