Sunday, January 22, 2012

Chili Mac

In my quest to find and make food that Marvel can eat, I acquired several allergy-free cookbooks.  One of which being Allergy Proof Recipes for Kids.  Like all cookbooks, I hang on to them for several months (sometimes even years), taking them out occasionally to look through and make lists of things I'd like to make, then one day I actually make a recipe out of them! Oh my, gasp, oo, ah!  There was such an occasion that occurred just last week.  I opened up my Allergy Proof Recipes for Kids and actually made a recipe.  I didn't have high expectations, but I was greatly surprised when my kids scarfed it down, had seconds, AND an hour later asked for more.  It was crazy.  I guess it was a hit.  I DO have to admit that the sauce was a little, mmm, off?  So I added about a teaspoon of sugar to taste.  


  • 1 box (8-12 oz) gluten-free elbow macaroni (if you don't want to go gluten-free, you can use regular macaroni noodles)
  • 1 lb ground beef
  • 3/4 cup chopped onion
  • 1 (8 oz) can tomato paste
  • 1 (4 oz) can diced green chili peppers, drained
  • 2 tsp chili powder
  • 1/2 tsp salt
  • 1 tsp minced garlic
  • 1 (15 oz) can red kidney beans, drained
Cook noodles according to the package directions.  Rinse with cold water and set aside.

In a skillet, brown beef and onion until cooked completely.  Stir in the tomato paste plus one can (8 oz) of water.  Add the chili peppers, chili powder, salt, and garlic.  Add the noodles and the kidney beans and stir to combine.

Monday, January 2, 2012

Lemon Bars #1

I've decided to discover the best lemon bars. This was recipe #1. It was quite delicious, had the lemony tart, but something was missing. If you like lemon curd or lemon preserves, this is great. It has a little crust with a LOT of lemony filling. I like my lemon bars a little chewier, but I can't say I didn't like them. I pretty much downed a whole row by myself (somewhat to my credit - the short row, not the long one). So if you have (or know of) a good lemon bar (or any other lemony) recipe, let me know! Beware, this recipe makes a LOT. Next time I will definitely 1/2 it!

For the crust:
  • 1 cup butter, softened (supposed to be unsalted, but I like salt, so I don't bother)
  • 1/2 cup sugar
  • 2 cups flour
  • 1/8 tsp salt
For the filling:
  • 6 eggs
  • 3 cups sugar
  • 2 Tbsp grated lemon zest
  • 1 cup freshly squeezed lemon juice
  • 1 cup flour
  • Confectioners' sugar, for dusting
Preheat oven to 350°.

For the crust, cream the butter and sugar in a mixing bowl until light.  Combine the flour and salt and with the mixer on low, add to the butter until just mixed.  Flatten the dough with floured hands and press it into a greasted 9x13x2-inch baking sheet, building up a 1/2 inch edge on all sides.  Chill for 15 minutes.  

Bake the crust for 15 to 20 minutes, until very lightly browned.  Let cool on a wire rack.  Leave the oven on.

For the filling, whisk together the eggs, sugar, lemon zest, lemon juice, and flour.  Pour over the crust (crust does not need to be completely cooled)  and bake for 30 to 35 minutes, until the filling is set.  Let cool to room temperature.  

Cut into squares and dust with confectioners' sugar.

Lemon Bars #2

A couple of years ago we lived on this beautiful 30-acre property in a beautiful area with cows and chickens and fruit trees and wild blackberries galore...I miss it so.  There were a couple of lemon trees, which meant way more lemons then we knew what to do with.  We gave them away.  Had lemonade almost every day.  I even squeezed the juice and froze tons and tons in ice cube trays.  So I went on a quest to find lemon recipes.  Lemon bars was high on my list.  I love lemony goodies.  Lemon cake, lemon bars, lemon sorbet, lemon glaze...I pretty much did it all (ok, I guess I didn't make lemon sorbet, but I wanted to!)  This was one of the recipes I tried.  It comes from Bakerella, which means it must be fabulous (anything from Bakerella or the Pioneer Women is sure to be out of this world!).
For the Crust:
  • 1 cup butter
  • 1 3/4 cups flour
  • 2/3 cups confectionary sugar (plus more for dusting)
Topping:
  • 1 1/2 cups sugar
  • 1/4 cup flour
  • 1 tsp baking powder
  • 1/2 cup lemon juice
  • 4 whole eggs, slightly beaten
Preheat oven to 350°.  Grease and flour a 9x13 pan.

To make crust:
In a medium bowl, whisk together flour and confectioner's sugar.  Cut in butter until combined and crumbly.  Press crust mixture into bottom of pan.  Bake for 20 minutes or until golden.  

To make topping: 

While crust is baking, prepare topping.  In a larger bowl, add sugar, flour, and baking powder.  Then add slightly beaten eggs and lemon juice.  Mix well and pour on top of warm baked crust.  Bake for 20-25 minutes.

When cool, dust with confectioner's sugar and refrigerate.  Cut into bars.

Makes 2 dozen.

(If you only want to make a small batch, this works great cut in half and baked in a 8x8 baking pan!)

Chewy-Gooey Bars

This recipe is another delicious Tasty Kitchen find. It is oh so chewy and gooey...just the way I like it! And oh the smell when the oven is first opened...simply heavenly!

  • 1 cup brown sugar
  • 1 tsp salt
  • 1/2 tsp baking soda
  • 1 1/2 cups quick cooking oats
  • 1 1/4 cups flour
  • 1 egg
  • 1/2 cup butter
  • 12 oz (about 1 1/2 cups) chocolate chips (asks for semi-sweet, but I'm a milk chocolate girl!)
  • 1 (14 oz) can sweetened, condensed milk
  • Preheat oven to 350°. In a medium bowl, combine brown sugar, salt, baking soda, oats, and flour. Add egg and butter. Combine mixture using a pastry blender or two forks. Press about 2/3 of the mixture in a 9x13" pan. Sprinkle chocolate chips over the top, and then drizzle sweetened condensed milk over the top. Sprinkle with reserved crust mixture. Bake for 25-30 minutes, or until crust is golden. Let cool slightly before cooling.

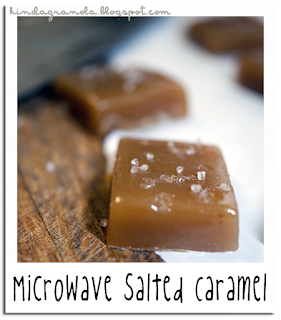
Salted Microwave Caramels

I haven't got much of a sweet tooth.  I do enjoy sweets, but not all too often.  And I'm pretty picky about those that I choose to indulge in.  My one true weakness is caramel.  Not just any caramel, though.  Oh no. It has to be salty!  Sounds weird, but it really isn't.  You must know by now that salt is in pretty much everything, so why do people think its so weird when I say I like a bit more salt in my sweets?  Mmm.  


For as much as I absolutely LOVE caramel, I've never actually made it before.  Making candy scares me.  Mainly because I'm impatient and I don't want to have to sit hovered over a simmering pot watching the thermometer rising.  Like a year or so ago I attended a candy making class at church.  They showed us how to make caramel and I decided it doesn't seem so hard.  But again, I didn't want to sit over the pot watching that darn thermometer!  The ladies teaching sent us home with a few pages of tried and true candy recipes and on it was one for microwaveable caramel.  I was a little hesitant, but finally after a year or so, I've actually tried it!  


The consensus:  Seeing as I consider myself a connoisseur of caramel, I found it quite delicious, although not particularly the best I've ever had.  Mind you I AM a connoisseur, so to the average pallet, it would most likely be outrageous!  The absolute BEST part?  It took less then 10-15 minutes start to finish to make (well, minus the cooling time at the end)!  Can't beat that!

(this isn't my picture...it got eaten too fast for me to take one!  This one came from here)
  • 1/4 cup unsalted butter
  • 1/2 cup granulated sugar
  • 1/2 cup packed brown sugar
  • 1/2 cup light corn syrup
  • 1/2 cup sweetened condensed milk
  • 1 Tbsp coarse sea salt (approximate)
Combine all ingredients in a microwave safe bowl.

Microwave on high for 6 minutes, stirring every 2 minutes until all ingredients are thoroughly combined and sugars are melted completely.  If mixture looks grainy, microwave in 1 minute intervals, stirring thoroughly until mixture is creamy and has no lumps.

Stir into a well greased 8x8-inch dish and allow to cool for at least 15 minutes.

Sprinkle sea salt over mixture and refrigerate for at least one hour.

Cut, wrap in wax paper and store refrigerated in an air-tight container for up to 3 weeks.

Cheesy Fondue

We've had a New Years tradition in my family for as long as I can remember.  On New Year's day, my mom would put out all sorts of snacky foods and make cheese fondue from all of the Hickory Farms cheese they would get in the mail from friends and relatives.  When we got married, I introduced this cheesy goodness to Music Man.  He was an instant fan!  This is only my 3rd or 4th year of making it myself.  Its easy, fairly quick, and so good!


  • 1 to 1 1/2 cups apple juice (traditionally uses wine, but I'm not a wine drinker, so I prefer juice)
  • 7-8 cups shredded cheese (use a variety! One year I used about 6 cups of Jarlsburg Swiss, a cup of sharp cheddar and about a cup of those little round cheeses rapped in red wax and wrapping.  This year I used the shredded Swiss/Gruyere mix from Trader Joes (about 6 cups) and added 1-2 cups of cheddar)
  • 1/2 to 1 clove garlic, minced
  • Cubed bread (and/or cut veggies, meat, or anything else you would like to dip)
Heat a medium sauce pot on medium heat. Rub minced garlic on bottom of pan. Pour in apple juice (start with 1 cup and add more if needed after adding the cheese); bring to a boil. Slowly add in shredded cheeses. Constantly stir until cheeses have thoroughly melted. If it seems to thick, add a little more apple juice at a time. If it seems to thin, dissolve some corn starch in water and add to your fondue to thicken it a bit. You want it to be a thick enough consistency so it will coat your bread, but not to thick so as to slide right off. When done, keep in the pan and dip your bread with a fork into your fondue, or place cheese mixture in a fondue pot and enjoy!