Sunday, September 4, 2011

Cloth Diapers


I LOVE cloth diapers!  If you would have asked me with my first child if I'd EVER use cloth diapers, I'd say you're out of your mind to even think I'd consider it!  Cloth diapering is like homeschooling.  When you have the right tools, you've done your research, and you actually know what you're doing and do it right, it's so awesome (not always easy, but awesome)!  I always thought cloth diapering meant I had to do it the way my parents did...prefolds with pins and noisy plastic covers that made your kids legs turn purple, and the toilet dunking and flushing has always totally turned me off!  Really, who wants to do that?  Certainly NOT me.  Try to get my husband to do that...not in a million years!  

When my 2nd child was born, I learned about a new thing called g-diapers.  They're kind of a hybrid...reusable, but you can also put in disposable inserts that biodegrade in like 3 days.  That sounded right up my alley, but at the time I wasn't sure if I wanted to make that giant (or so I thought) leap of faith and invest in something I wasn't sure I wanted to do.  So I never did it.  BUT I DID buy a couple cloth diapers to try.  I can't even tell you the brands of them all, but they were mainly prefolds with covers.  I HATED them, so I put them aside and never used them again.

Then came my 3rd baby.  I started him out like all the rest in disposables.  One morning when he was about 3 months old, I woke up and looked to the side of my bed where I'd tossed all of the diapers from the night and realized how MANY diapers I use in ONE night.  That's not even including the day.  The environmental impact definitely crossed my mind, but even more so was the fact that I was litereally throwing money away.  There was a pile of money sitting next to my bed, soaked in my child's business, waiting to be taken out to the trash.  Money, just thrown away.  And I had been just throwing money away like this for 8 years!  

Thats when I made the change.  I put out a call to all of my Facebook friends - which cloth diapers were the best.  Surprisingly I found a LOT of my friends were doing it and I didn't even know.  I decided to try out one BumGenius, since they sold them at our local maternity/mother/baby store.  I love, love, LOVED it!  It was so easy to use.  I couldn't believe it!  It was surprisingly easy to talk my husband into letting me invest a little money into buying a dozen diapers.  I got him at "these will last him at least a year and in less then 3 months we will have paid for the diapers."  He was sold!  

I'm not one to try to talk anyone into switching over unless they're interested.  Here are a few tips, though when considering switching:
  1. Shop around and see what's new and what will work best for you.  I wanted something that would grow with my baby so I wouldn't have to buy different sizes every time he had a growth spirt.  And I've been totally turned off to prefolds (they work for LOTS of people, just not me!), so I wanted something that was either an all-in-one (AIO) or had pocket inserts.  Plus I love that I can add an insert for the night time for extra hold.  
  2. Consider a diaper sprayer.  Its a special sprayer that attaches to your toilet (it can also double as a bidet they say, but I don't know why you'd want to use freezing cold water for that!).  You definitely don't NEED one, but I LOVE it!  All of that dunking and flushing I feared, is all resolved with one simple spray and flush.  SO easy!  
  3. Get a good amount.  I recommend getting at least 15.  The more you get, the less often you have to wash them.  I only have 13, so I have to wash them at least every other day.  Keep into account that if you hang dry them, it'll take at least a day to dry.  
  4. Wash them according to the manufacturer's suggestions.  You should at least wash them every 3 days or else they'll start stinking and I'm sure eventually get mildewy.  Make sure you use the right detergent and wash them according to the directions so as to prevent your diapers from repelling moister, as opposed to absorbing it!

I can't tell you how nice it is to not have to buy diapers any more!  My 4-year old is actually a bed wetter still, which I've recently bought a reusable pull-up for him to try out.  It works great (I got the One Step Ahead DriNights), but since I've only got 1, I either have to wash it every day or use something else occasionally, so I put on a BumGenius...it works great on him too AND I'm saving SO much money on not buying pull-ups any more.  

What are the benefits of cloth diapering?
  1. Saves money.  Like I said, after just a few months you're already saving money!
  2. Bringing down your trash consumption.  My trash was filling up so fast, now it's not. So nice not to have to jam the trash bags in and hope the trash man will take my heaping pile.  The biggest argument I've found when talking about the environmental impact of cloth diapers is if it is better to fill up the landfills, or use up more water.  From what I've researched, it takes WAY more water to make the disposable diapers, then to clean my cloth ones.  So I'm both saving water AND lessening my trash by using cloth!
  3. They look so darn cute!  My baby's bum has never looked cuter :-)  They really are so stinkin' cute...so much better then just plain ol' white plastic diapers!

Homemade Laundry Soap

I've been wanting to make my own laundry soap for a while now.  I have my own reasons for wanting to do so.  First off I do TONS of laundry a day, so the cost of soap, plus the annoyance of running in to town to buy MORE soap is frustrating.  I'd definitely like to bring the cost and travel down.  

There's also the fact that companies pump their products full of harmful chemicals to make our clothes supposedly look, feel, and smell better....something I definitely don't like exposing my family to.

The main (and really the REAL) reason why I want, need, have to make my own laundry soap is for my poor baby #2.  He has dreadfully awful allergies and eczema.  I have to buy the dye-free, fragrance-free soap for him, but even then sometimes there are hidden chemicals that irritate his skin.  I've been on a search to find a good soap that won't irritate him, but its hard to find.  I usually get ALL Free & Clear, which works the best so far, but going back to my first reason, I don't like having to buy a new bottle every 2 weeks.  It gets expensive.  I'm telling ya, with 3 little boys running around, I've got LOTS of laundry!

So we're giving homemade soap a try.  I searched the internet high and low for a good recipe.  They're all basically the same.  My sister has been making her own for a while now and handed her tried and true recipe over to me.  I let her do all of the testing and dingying of whites for me.  We both have hard water (even though she's in Wyoming & I'm in California), so her recipe is adjusted for just that.  I've been using it for probably 3 or more weeks now...so far so good!  Everything is coming out nice and clean, so there's no complaints here!


Homemade Laundry Soap
  • 1/2 bar soap (my sister uses Fels Napa, but since it has fragrance in it, I chose to use Dr. Bronner's Peppermint Castile Bar Soap, which I found at Trader Joes.  If you can find it somewhere else, they have LOTS of other scents-which are essential oils, NOT chemical fragrances!- that you might like better for your laundry) Update:  Now that I've been using this for a little while now, I can safely say that I LOVE it!  It works better than any store bought stuff ever did.  The only change that I've made is to the soap.  I loved the Dr. Bronner's (I actually loved the peppermint scent!), but it seemed to irritate my little Captain's skin (not as bad as normal detergent, but enough), so I switched to Trader Joe's Oatmeal & Honey soap bars.  So far so good!
  • 1 cup Borax
  • 1 cup Washing Soda
  • 1 cup Baking Soda
  • 1 cup OxiClean (powdered)
Grate the bar of soap.  You can do this with a regular cheese grater or your food processor (I used my food processor, but beware, its pretty hard on it, so do with caution!).

Add all of the ingredients to your food processor, chop until it is a fine powder (NOTE:  the soap won't be quite as fine as the rest of the ingredients).  Poor into an air-tight container.

For a HE front loaders, use 1 Tbsp.

For normal, non-fancy top-loaders, like my own, use about 1/4 cup.

You can add or subtract the amounts of soap you use according to how your clothes turn out.

Chicken Dorito Casserole

My sister-in-law passed this recipe on to me a couple years ago. When she had her first baby, a lady from church brought this to her and she ate it 4 days in a row, she loved it so much.  Of course the first time I tried it (a couple years ago), I made it all wrong.  I didn't get what Rotel tomatoes were (Rotel is the brand & they're the ones that are diced w/jalapenos), so I just used regular diced tomatoes.  And I switched the soups...used 2 cream of mushrooms & 1 chicken.  It was very bland.  I couldn't understand what was so great about it and haven't made it since.  A couple months ago I had a huge bag of Doritos I wanted to get rid of, so I tried this again...the right way!  It was tasty.  My boys loved it, my hubs loved it, I loved it.  And then I made it 2 more times after that.  It definitely isn't the healthiest meal on the planet, in fact you can't really get much more processed (unless I guess you used American cheese...bleh!!), so it pretty much kills me every time I make it (most likely literally).  But it is so easy to make and everyone likes it, so its a good treat every now and then! (please don't judge my photography skills on this pict...my cameras are all busted, so I've been using my husband's iPhone, which does not focus good. In fact it pretty much stinks unless I've got PERFECT lighting, which NEVER happens!)


  • 1 can Cream of Mushroom soup
  • 2 cans Cream of Chicken soup
  • 1 can Rotel tomatoes (the can of tomatoes w/diced jalapenos in it)
  • 1 can water
  • 4 boneless, skinless chicken breasts
  • 1 (13-16 oz) bag nacho cheese Doritos
  • Shredded cheese (I usually use Monterey Jack or cheddar)
  • Sour cream (for topping)
Preheat oven to 375°.  Boil chicken, shred, and set aside for later.  Mix the canned ingredients (and water) together and set aside.  In a 9x13" casserole dish, put a layer of Doritos to cover the bottom.  Layer 1/2 chicken on top of Doritos and then ladle 1/2 soup mixture on top of this.  Repeat the layers (Doritos, chicken, soup mix) with the rest of the ingredients and then sprinkle shredded cheese to cover the top.  Bake for 30 minutes and then let cool.  Serve topped with a spoonful of sour cream.

Serves 6.

Tuesday, August 16, 2011

Cataloging Your Home Library


My family loves books.  My husband loves to read.  My kids love to read (well be read to and look at pictures).  I like to read (you got that right, I didn't say LOVE & that was on purpose).  I have an incredibly soft spot for old classics and children's books.  If I have money and a good book in front of me, its VERY hard for me to resist (even harder for my husband to resist)!  So we've got a good little library growing, which I love.  The only problem is now that its getting bigger, I know that I have books, I just don't know how to find or organize them.  I might need a book on a certain subject, but I don't know what I have, then a month after I needed them, they all pop up.  Quite frustrating.

So today (just like 1/2 hour ago actually...I'm really excited about it!) I came across this really cool site.  Its called Delicious Monster.  I always seem to be a little behind the times, so you've probably heard of it or something like it, but I haven't.  You simply hold the barcode on your book up to the web cam, the program scans it, recognizes it, and catalogs it!  Its as easy as that!  It does DVDs and CDs, too, as well as all of your digital media (digital books, movies, iTunes, etc).  Once I have all of my library cataloged, I can go back and search by subject, title, author and know just what I have.  Im so excited about this!  And my kids think its so cool so zi can actually get them to do all the scanning for me...moo-wa-ha-ha!

Monday, August 15, 2011

Seafood Boil

This weekend we had our first annual Seafood Boil here at the house.  I seriously need to sleep for a week to recover from these last few weeks (remember, just the week before my son had his Willy Wonka party and we had 18 people staying at our house!).  I'm wiped out!  Originally we had invited a group of people (30-50 people) from church, but unbeknownst to us it was announced to EVERYONE that they were invited.  If everyone would have come, that'd be like 200+ people.  Luckily since it was last minute, we had a decent turn out of about 100.  Ya, we kinda freaked out inside, freaked out a little more, then somehow with some AWESOME help, it all pulled together wonderfully!  An AWESOME couple totally pulled through for us and did SO much work...the shopping, brought in some extra bbq's, manned the bbq's and worked their tales off!  The best comment of the day for me was when he commented to me, "Sorry we ever doubted you, this is SOOO good!  I'm gonna go home and make this!"  Mission accomplished! :-)


  • 4 lbs seafood (you can add whatever you want!  We tried tiger prawns, whole dungenous crab, king crab legs, clams, mussels, and a seafood medley of calamari, clams, and shrimp.  By far the biggest hits were the tiger prawns, followed by the king crab legs, then dungenous crab.  Next time we do it, I think we'll just stick to those 3)
  • 2 lbs kielbasa, cut into 2 inch pieces
  • 4 lbs red potatoes
  • 6 ears sweet corn on the cob, halved, frozen or fresh (figure 1/2 to 1 cob per person)
  • 1 to 2 boxes Zatarain's crab boil (you should be able to find it in the spice section of the grocery store by all of the Creole seasonings)
You'll also need:
  • 1 large stock pot, 10-12 quarts (best if it has a strainer in it...makes things easier in the end)
  • 1 large slotted spoon or a large metal strainer
Prepare all of your ingredients (cut anything that needs to be cut, etc so its all ready when it comes time to put them in the pot).  

Fill your pot about 1/2 full of water and bring to a boil (can do on a bbq, stove top, whatever). 

Add Zatarain's crab boil (we used the kind in a bag, so you just throw the bag in) and red potatoes.  Cook for about 10-15 minutes.

Add sausage and sweet corn and cook for another 5-10 minutes.

Add seafood and cook for about 5 minutes (or until the seafood is done, but be sure not to overcook it!).  

Poor out the water / strain the food (either with a strainer or ladle it out with a slotted spoon).  Arrange food on a serving platter or pour out onto newspaper laid out on tables.

Enjoy!

Serves about 12 (or 6 REALLY hungry guests)

Sunday, August 14, 2011

Fruit Dip (aka Creamy Goodness)


This is ALWAYS a crowd pleaser!  Its so good and goes great with all types of fruit.  Some of our faves are strawberries, pineapple, & cantaloupe.  I most recently served this at my son's Willy Wonka party in the creamy mushroom.  Mmm, my favorite!

  • 1 (7 ounce) jar Kraft marshmallow creme
  • 3 Tbsp orange juice
  • 1 Tbsp orange rind, grated
  • 1 (8 ounce) pkg cream cheese, softened
Mix together with beater until smooth.  Serve with cut up fruit of your choice.

Willy Wonka Party

Last weekend we celebrated my oldest sons birthday with a big birthday bash.  I'm all about themes...for Halloween we always go with a family theme, for birthdays we go with a theme.  It makes things more fun.  And I must note that since I only do a birthday party (well a big one with friends) every 3 years (1 boy a year), I go a little nutso.  I go WAY above and beyond.  I'm just crazy like that.  Its just too much fun for me!  I have to remind my husband that if I actually had money to spend, he'd better watch out!

The theme for this party was Willy Wonka.  You can say my family is a little obsessed with Willy Wonka...the original, Gene Wilder version, that is...the GOOD one.  REALLY is there even a comparison?  It's just so clever!  We've read Charlie & the Chocolate Factory for our night time reading.  My boys watch the movie pretty much once a week.  We quote it on a regular basis.  It's just so good!  Really what is NOT to love about it (other then the creepy boat ride in the tunnel)?

I just had SO much FUN putting this all together and so much MORE FUN watching all of the kids enjoy it!

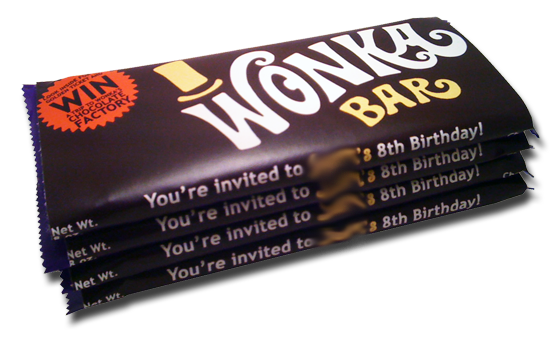
Here's the invites (modeled after the Wonka bars in the movie):


I printed them out, then wrapped them around a real Scrumdiddlyumptious bar (found them at Target).  Here's what the backs looked like:


Inside each wrapper was a golden ticket (this image is B&W, but it was printed on gold paper):


I'm SOOO bummed that I don't have a good working camera right now.  So all I have to share with you are from my husband's iPhone, which only takes good pictures when in perfect sunlight!  So most all of these are blurry or grainy.  I'm REALLY bummed!

The day of the party we actually had 18 family members staying at our house.  I really wanted the "Chocolate Factory" to be a surprise to everyone, so I had to barricade the living room so no one would go in.


As the kids arrived, we had them wait downstairs for our VERY SPECIAL BIRTHDAY GUEST.  


Can you guess who it might be?

Why it's Mr. Willy Wonka himself!! (aka my husband)


The first order of business was to have each child sign Wonka's contract.


Cue "Pure Imagination" and now it's time to introduce the Chocolate Factory!  Sooo Exciting!
My son's expression and excitement was worth every minute of work and every late night I spent getting ready for his party!


Ladies and gentlemen, introducing the Chocolate Factory!


Here's a closer look:


There was Wonka Vision, with Mike TeeVee Dinners, Fizzy Lifting Drink Testing Room, Willy Wonka & an Oompa Loompa portrait, the candy man's Candy Shop, a candy tree, and the goose that lays the golden chocolate eggs!  Phew!

But what would a proper chocolate factory be without a

CHOCOLATE WATERFALL!

No other factory in the world mixes its chocolate by waterfall. 
But it's the only way if you want it just right. 


Mmm!

I don't blaim Augustus Gloop in the slightest.  I would have done the same thing in his position!

The chocolate waterfall ended in a scrumptious fountain of silky milk chocolate...


...flowing into a chocolate river scattered with delicious treats.  


My personal favorite (from the movie AND the party)...the mushroom filled with creamy goodness!  My 4-year-old was so upset when I dipped a strawberry in it.  He told me "No Mom, you're supposed to scoop it up with your hand, just like the movie!"  Mmm, wouldn't I have LOVED to do that, but somehow I refrained.

My lil' sis made the cutest Wonka cupcakes EVER!  And they were SO delicious!  You seriously would never be able to guess that they were gluten-free, dairy-free!


For activities, we played a golden chocolate goose relay (the kids raced to get the golden egg and run back to their spot first), pop Violet Beauregarde (which we didn't actually play since a few of the kids were a little more than bothered by popping balloons), 


Wonka Trivia, and creating your own Everlasting Gobstopper in the Inventing Room.


I think the biggest hit of the party was watching everyone pose as Willy Wonka & his Oompa Loompa pal!


Such a fun, fun party!  

Thanks to everyone who came and enjoyed everything.  And thanks to my son most of all for having a birthday and loving Willy Wonka as much as I do!


{Click here to download all of my Wonka printables...beware its a BIG file.}